
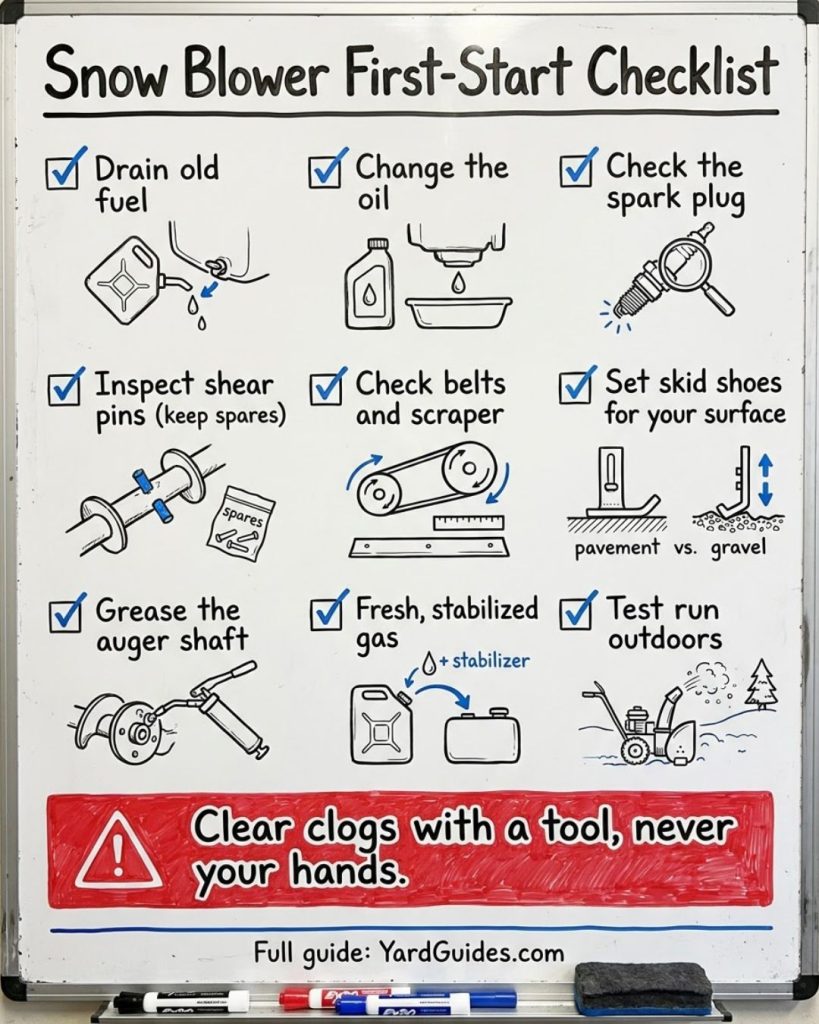
Quick answer: Before the first snow, get your snow blower ready in this order: drain or run out old fuel, change the oil (4-cycle engines), check the spark plug, inspect the shear pins, belts and scraper, grease the auger shaft, set the skid shoes for your driveway, then fill with fresh, stabilized gas and do a test run. Doing this on a calm fall afternoon beats finding a problem at 6 a.m. in a foot of snow.
Jump to the table: Quick-reference table ↓
YardGuides may earn a commission from links on this page, at no cost to you.
First, find your owner’s manual. Oil type and capacity, shear pin part numbers, and skid shoe adjustment differ by model. The steps below come from Briggs & Stratton and Toro. Your manual has the final word on specs.
The 10-step first-start checklist
1. Deal with last season’s fuel
Gas left in the tank since last winter is the top reason a snow blower won’t start. Briggs & Stratton says to drain leftover fuel completely, because old fuel can clog the carburetor and cause starting problems. Toro says if you didn’t drain it in spring, empty it by running the engine dry. Dispose of old gas properly: check with your local household hazardous waste program.
2. Change the oil (4-cycle engines)
Toro says that if you have a 4-cycle engine and didn’t change the oil last spring, now is the time. Briggs notes that cold weather thickens oil, so the right winter-grade oil matters. Use the viscosity in your manual. 2-cycle snow blowers mix oil into the fuel, so this step doesn’t apply.
Shop snow blower engine oil
3. Check the spark plug
“Starting a snow blower will always be easier if the spark plug is in good condition,” says Toro. Briggs recommends looking for wear or damage, cleaning carbon off with a wire brush, and replacing the plug if it looks corroded. A new plug is cheap insurance. Match the part number in your manual.
Shop spark plug sockets
4. Inspect the shear pins
On two-stage machines, shear pins connect the auger to its shaft. They’re designed to break if the auger hits something hard, which protects the engine and drive system. Briggs says to inspect them and keep a few spares on hand. Replace any that are missing or broken, using the pins made for your model.
Shop snow blower shear pins
5. Look over the belts
Toro says to inspect the drive belt for fraying, cracking or stretching. Briggs adds that a worn belt can stop you mid-job. Toro also suggests keeping a spare belt on hand in case one breaks while you’re clearing snow.
6. Check the scraper bar and rotor blades
Toro recommends inspecting the rotor blades and scraper before each season. Briggs says to adjust or replace a worn scraper blade so it clears cleanly without damaging your driveway.
7. Set the skid shoes
Briggs says to adjust the skid shoes to the right height for your surface, especially on gravel, so the auger doesn’t pick up rocks and throw them. On smooth pavement you can usually run them lower. Your manual shows the adjustment.
Free printable: seasonal maintenance checklist for your mower & tractor
A 2-page spring-to-winter checklist for riding and push mowers and compact tractors. Then short, practical emails a couple of times a month. Unsubscribe anytime.
8. Grease and lubricate
Briggs says to grease the auger shaft at least once per season, following your manual. On two-stage machines, Toro suggests greasing the wheel shafts to keep rust off.
Shop grease guns
9. Add fresh, stabilized fuel
Toro says to use gas less than 30 days old. If you add stabilizer the day you buy it, Toro says it should stay fresh for 4–6 months. That’s handy, since a snow blower might sit for weeks between storms. More on that in our guide to whether fuel stabilizer really works.
Shop fuel stabilizer
10. Do a test run, outdoors
Consumer Reports suggests starting the machine, running the auger, and driving it back and forth at different speeds to make sure everything works. Do this outside or with the garage door fully open. Engine exhaust contains carbon monoxide, which can build up quickly in an enclosed space (CPSC carbon monoxide information).
Safety: never clear a clog with your hands
Snow clogs in the chute are inevitable, and they’re how most snow blower hand injuries happen. Briggs & Stratton’s rule: turn the snow blower off, use a tool (not your hands), and follow your manual to clear the blockage. Many machines come with a clearing tool clipped to the housing. Keep it there.
Quick-reference table
| Check | What to look for | Source |
|---|---|---|
| Old fuel | Drain it or run the engine dry | Briggs, Toro |
| Oil (4-cycle) | Change if not done in spring; winter grade per manual | Toro, Briggs |
| Spark plug | Wear, carbon, corrosion; replace if in doubt | Briggs, Toro |
| Shear pins | Missing or broken; keep spares | Briggs |
| Belts | Fraying, cracking, stretching | Toro, Briggs |
| Scraper and rotor | Wear | Toro, Briggs |
| Skid shoes | Height for your surface (raise for gravel) | Briggs |
| Auger shaft | Grease once per season | Briggs |
| Fuel | Under 30 days old, stabilized | Toro |
| Test run | Auger and all speeds, outdoors | Consumer Reports |
FAQ
When should I get my snow blower ready?
Before the first forecast snow. Parts like shear pins and belts are easier to find before a storm than during one.
Do I need to change the oil every year?
Follow your manual. Toro says that if you didn’t change the oil in spring, change it before winter.
Why won’t my snow blower start after summer?
Old fuel is the usual culprit. Drain it, refill with fresh stabilized gas, and check the spark plug. If it still won’t start, the carburetor may need cleaning.
What are shear pins for?
They’re designed to break when the auger hits something hard, protecting the engine and gearbox. Always keep spares.
Same engine as your mower? Many snow blowers use the same small engines as lawn mowers. See our lawn mower winterizing guide for the storage side of the year.